SpeakApp
brainstorming meetings online
User Guide
This guide should help you to use SpeakApp most effectively. You may find the topic you are interested in by using your browser interface (CtrlF or ⌘F). At any time in the application, you can invoke a contextual help by pressing F1 or ⌘?, or by clicking the Help link in the footer.
If you cannot find a relevant answer here or you have some questions, please contact us.
Requirements
Web browser
The officially supported browsers are the latest stable versions of Chrome, Firefox and Safari, but our users seamlessly run SpeakApp in Edge, Chromium, Opera, Vivaldi, Iron, Brave and other web browsers as well. Basically, any HTML5 browser with full WebRTC support is considered a web browser.
Network and firewall
To join a meeting, you have to allow all network traffic (both TCP and UDP) to destination ports 443 and 3478 to at least the following addresses: speakapp.link, get.speakapp.link and ice.speakapp.link. You may have a specific option on your firewall or router to enable WebRTC/VoIP applications like SpeakApp. On most routers, the default settings are sufficient.
Audio equipment
It goes without saying you have to have some microphone and speakers, headphones or earphones to be able to speak up and hear other participants. You can test your audio setup anytime.
Before a Meeting
This section describes the main user interface available after logging in.
Meetings
Here you can browse present, future and past meetings from all the communities you have subscribed to. You may sort the meetings by name, time and community name by clicking on the respective table header. Ongoing meetings are highlighted in red as you can see below.
| Name | Time | Community | |
|---|---|---|---|
| Ongoing meeting | 15:45 - 21:54 CEST | Example | |
| Future meeting | 16:45 - 17:15 CEST | Example | |
| Future meeting | 17:15 - 17:45 CEST | Example |
Clicking the meeting will trigger the following popover:
Meeting name
Please note, that not all of the action buttons have to be present. If no action can be taken, there are no buttons, only the link to join the meeting selected automatically upon opening the popover so you can easily copy it to the clipboard using the copy button next to the link or by pressing CtrlC or ⌘C.
- Join
- Press it to join the selected meeting. You will be redirected directly to the meeting if it is ready. If not, you will have to wait few minutes, but not more than five.
- Edit
- Click it to edit selected meeting. The form is the same as the booking form, except for action buttons (you can delete the meeting, save or discard changes). Editing does not change the link to join the meeting.
- End now
- Ends selected meeting immediately. The button is present only if the meeting has been booked by you or within a community you manage. After closing the meeting you will be asked if you would like to book the next meeting in the series.
Booking
Here you can book a meeting by filling the form and then submitting it. Meeting description will be advertised to the participants when they join. You can use some basic LaTeX inline math, e.g. $x^2$.
There are two kinds of meetings, with and without a moderator. At the round table every participant is free to speak up and upload slides at any time, whereas if the meeting is moderated these actions need moderator approval.
You may restrict access to the meeting by setting a password and/or by disabling the following options:
which affects users not subscribed to the community in which the meeting is being booked;
which affects users without SpeakApp account.
Of course, you can set the date and start time of the meeting:
Participants can join the meeting 10 minutes before the booked time, so you do not have to accomodate for the warm-up. On the contrary, if you use slides import from Confluence based on the start time, set the time exactly the same as at the page with slides.
The meeting duration is automatically extended as long as there is any participant, even after the "official" end time. But there is a possibility to manually close the meeting by pressing "End now" button on the meetings list, regardless of number of participating users.
Meeting series
If you want to create a meeting series
or define a recurrence schema by checking the
checkbox. If you use both options the explicitly defined meetings will go first and only after them the schema will kick in. Recurrent meetings are booked one by one, to avoid blocking all the available credit, therefore there is only one upcoming meeting on the meeting list.
You can also book the next meeting in the series by clicking the already closed meeting on the meetings list and answering "yes" to the question.
To cancel the upcoming meeting in the series, press "Cancel" button next to the date and time of the meeting.
SpeakApp can automatically add slides from Indico or Confluence to the meeting if you provide the URL of the associated meeting page or category.
If your community has not defined default Indico username and password, you should submit it yourself in the booking form. The same rule holds for the HTTP authentication (if required). Please note, that HTTP username and password are not your Indico username and password, but credentials needed to just access the Indico web page, before logging in.
For recurring meetings, you can provide the URL of the whole category. SpeakApp will pick the current meeting automatically based on the current meeting date and time.
If there are breaks in the schedule and the one actual session is split between more than one Indico sessions, you can add all the pages using the "Add the next session page" button.
If your community has not defined default Confluence username and password you should submit it yourself in the booking form. We recommend to set up a user with read-only access, just in case.
You may have one large page to cover all recurrence of your meeting like in the following example:
Mar 9th 14:30 JST
- TreeFitter, S. Higuchi
- Skimming report, M. Wilson
Feb 23rd 14:30 - 18:00 JST
- Track-Cluster matching, J. Stypula
- SVD status, K. McConnell
SpeakApp will pick the current meeting based on date and time headers on the page and fetch the linked slides (except for external links).
Alternatively, you can use a separate page for every meeting and provide the URL to the page containing links to those, like below:
SpeakApp will follow the link containing the current meeting date and time. You may use your usual date/time format as long as it contains a time zone abbreviation.
Please put the exact meeting start time, since otherwise, SpeakApp will not choose which slides to fetch.Press this button to cancel slides setup.
Instead of the built-in chat, you can embed an external chat service by providing its URL here. There may be some additional options you need to enable in your external chat to allow for embedding it in SpeakApp. Click the "Test it" button to test how the integration works.
You can designate meeting admins to help you with the meeting. They will have the same rights as you. They may modify the meeting, delete it, book the next meeting in the series, and manage the meeting admins (even remove themselves from the list).
Communities
Here you can manage your subscriptions and your communities.
To subscribe to a community you have to give its name. While typing you will see suggestions based on known public communities, but you can ignore them when subscribing to non-public ones. If the community requires an access key, you have to provide it.
User Settings
Here you can change your profile information, password, default time zone, or delete your account, if you want.
Log me out
Click it to log out.
At a Meeting
Just after entering a meeting room you will be asked to say something to test your microphone. Even if the meeting has already started, other participants will not hear this test. If SpeakApp does not hear your it will display an error message along with some advice. Please follow this advice.
Mute / Unmute
To toggle mute press M or click your name (nickname) or the microphone icon. When the icon is crossed you are muted, when displayed in red your voice is broadcasted. Please mute when not speaking to minimize background noise.
Slides
During a meeting, you can upload and present your slides. You may upload at any time, and it will not interrupt an already ongoing presentation since your slides will be shown only after you unmute yourself and choose your slides from the list. SpeakApp accepts only slides in Portable Document Format (PDF).
- Press this button to upload slides. Alternatively you may drop your slides into slide panel to upload at any time (even while other slides are being presented).
- To go to the next slide, press this button. You may as well left-click on the slide or use the following keys: , , Enter, Space, Page Down.
- To go to the previous slide, press this button. You may as well right-click on the slide or use the following keys: , , Backspace, Page Up.
- This will show slides in full screen mode. It is useful for projecting the slides in a conference room. You may as well use your browser shortcut key or F5.
- Press this button to rotate the slides 90 degrees clockwise for everyone at the meeting.
- By default, slides fit to screen height, but when you use the portrait view, you may want to use this button to fit the slides to screen width.
- Press this button to download currently shown slides.
You may also change slides by editing input field with page number and pressing Enter.
Laser pointer
While speaking, you can point at something on the slide using a mouse operated "laser pointer", which can be seen by other participants.
Drawing attention
To emphasize some particular part of the slide, you may draw on it by left-clicking on the slide and moving the pointer around. Right-click to clear the drawings.

Chat
Chat
[18:39:12] Someone (guest): Hey! What's up?
[18:40:01] Your name: SpeakApp ;-)
You can exchange text messages using chat. URLs are converted to clickable links. You can use some basic LaTeX inline math, e.g. $x^2$. By default, your message will be sent to all the participants.
-
If you want to message only selected participants, click this button and select the intended recipients. Choose @all to return to the default and include everyone in the conversation.
-
Click this button to download the chat content. The file will include the meeting name and the timestamp of the download.
Screen Sharing
To toggle screen sharing, click the screen icon. When the icon is displayed in red, your screen is broadcasted. You may choose if you want to share the entire screen or just one application's window (unless you use Safari, which only allows sharing the entire screen).
On Mac, you have to allow your web browser (other than Safari) to grab your screen first.
Recording
To start recording, click the REC button. Your web browser will do the recording and will ask you what to record. It is best to detach the browser tab with the meeting to a separate window and choose this window as the source for the video stream, so other things will not be recorded incidentally. You may switch to full-screen mode by pressing ⌃⌘F or F11. When the button is displayed in red, the recording is in progress. To stop the recording and save it, click the button again.
On Mac, you have to allow your web browser (other than Safari) to grab your screen first.
Settings
Here you can change your settings related to meetings, like turning on the "Clear" button to clear the drawings, or disabling video (screen share) or slides to save very limited network bandwidth.
Exit
Click it to exit the meeting.
At a Moderated Meeting
Moderated meetings have all the features of a non-moderated meeting plus the moderator, who has the power to mute participants, allow them to speak up, and give permissions to upload slides and share the screen.
If you are the moderator, click the eye icon located in the heading of the "Participants" list to enter the key to prove it. If the key is valid, the following controls will appear:
- Press this button to allow all participants to speak up.
- To mute everybody, press this button.
- Click on the participant's name to toggle his or her speaking rights.
Participants allowed to speak up can freely mute and unmute their microphones. The moderator cannot turn a participant's microphone on.
When a participant without permission wants to speak, upload slides, or share the screen, the moderator is notified and can decide to allow or deny the request.
Security at a meeting
If you are the meeting host, admin, or moderator, you can manage the security of the meeting by clicking the shield icon located in the heading of the "Participants" list.
You may:
- Lock the meeting room (let nobody in),
- Change the meeting password,
- Kick out misbehaving participants (intruders).
To prevent intruders from getting back, SpeakApp will lock the room until you change the meeting password.
Questions & Answers
Why do I have to wait for a meeting room to be built?
It is because every meeting has its own virtual machine in the cloud, a virtual meeting room. It takes few minutes to launch and configure a new instance. When a meeting is booked in advance the room is always ready 10 minutes before the official start.
Why my microphone does not work with SpeakApp?
Every microphone which works fine elsewhere in your operating system, should work with SpeakApp. If it is an USB model, please insert it prior to opening your browser, otherwise the browser may not see it connected, if so you have to restart the browser. Be aware that it is not enough to close one browser window or tab, you have to close them all (also background apps, if you have them enabled). Sometimes you have to unplug and replug the microphone to get it working.
Why I do not hear anybody, even though everyone can hear me?
I'm on iPhone or iPad.
It seems to be an "undocumented Safari feature" ;-) To fix this, just go to the "Home screen" and back to SpeakApp a couple times until you start to hear others..
I'm on a computer.
Probably your browser audio output is redirected to a different device if you have more than one speaking device connected, or it is simply muted. To check the cause and fix the problem, open your system sound settings. Usually, to get there, you will have to click the speaker icon located near the top right or the bottom right of the screen (on Mac go to "System Preferences"), and choose "Sound Settings" from the menu. Then, find your browser on the "Playback" (or "Output") tab, set its volume to 100% and select the adequate output device.
How to fix a "poor connection"?
"Poor connection" means, there are many lost packets between you and the meeting server. If you do not notice any degradation in audio or video, it might be a temporary glitch, but if you do, usually, one of the following solutions improves the connection:
- Check the Wi-Fi or cellular signal and move to a location with better parameters.
- For the duration of the meeting, disable all system updates and other CPU and network bandwidth intense operations to leave more resources to SpeakApp.
- Reconnect to the meeting (just reload the meeting page with CtrlR or ⌘R).
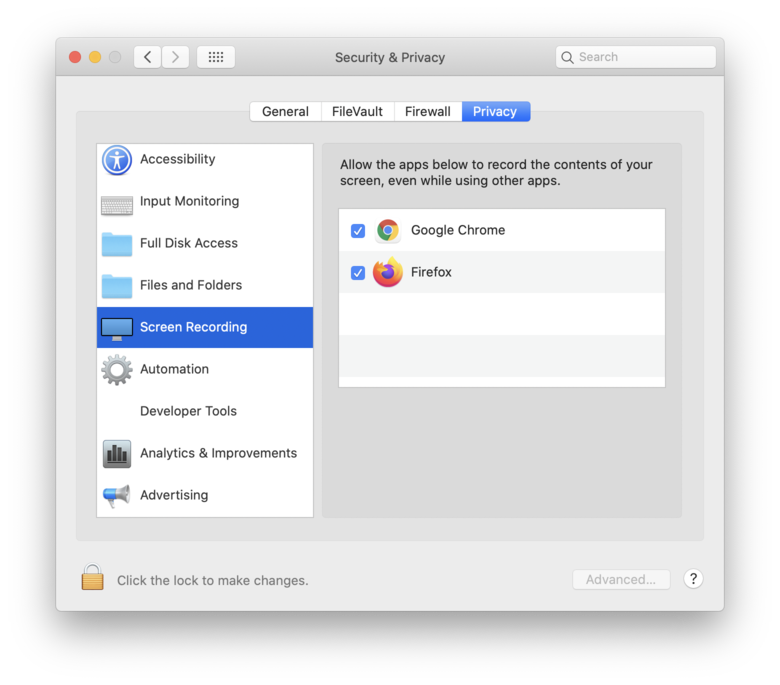
How to allow screen sharing and recording on Mac?
- On your Mac, choose Apple menu > System Preferences, click "Security & Privacy", then switch to "Privacy" tab.
- Select "Screen Recording" from the list on the left.
- Select the checkbox next to your web browser name to allow it to grab your screen.
See below:
Why can I not connect using my Firefox 58?
Firefox 58 has a bug which causes a connection to fail in the networks with strict firewall (blocked or restricted UDP). The bug is fixed in Firefox 59, please upgrade.
Where to find Indico API key?
Log in to the Indico and click your name on the right top side of the page to trigger a menu. Select "My preferences" and then choose "HTTP API" card. If there is no API key on that card click "Create API key".
Why there is no video in my Opera / Vivaldi?
Nor Opera nor Vivaldi has the license to distribute proprietary H.264 codec which SpeakApp uses to exchange video. You have to install it on your own from a legit source.
Installation is simple:
- Download the extra-codecs.sh installation script, that we prepared for you.
- Open a terminal in the directory in which you have the downloaded script.
- Issue the following commands in the terminal:
chmod +x extra-codecs.sh
./extra-codecs.sh
How to set up a secure integration with Confluence?
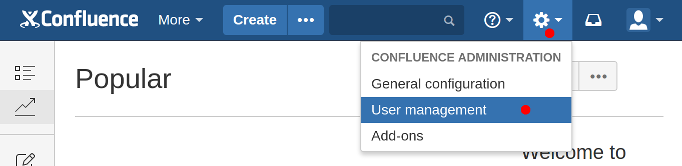
Confluence unlike Indico has no export API, therefore to maintain security an additional Confluence user with read-only access is highly recommended. The details depend on the structure and general configuration of your Confluence. If you use LDAP, just add the new user there with read-only rights. If you manage users with "Confluence Internal Directory" you can add the user at the "User management" page, which can be found in the cog icon drop-down menu.
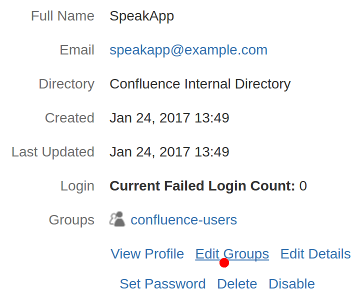
After adding click "Edit Groups", then "Deselect All Groups" and save.
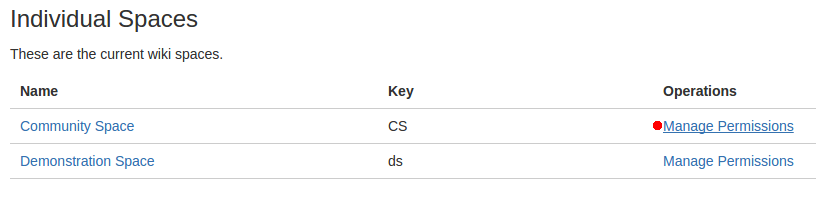
To grant view permissions to the new user go to the "Space Permissions" page available in the "USERS & SECURITY" section of the menu,
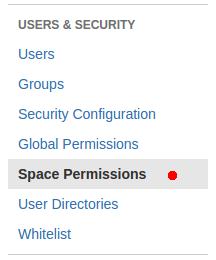
choose "Manage Permissions" by your community's space name, in the "Individual Spaces" section.
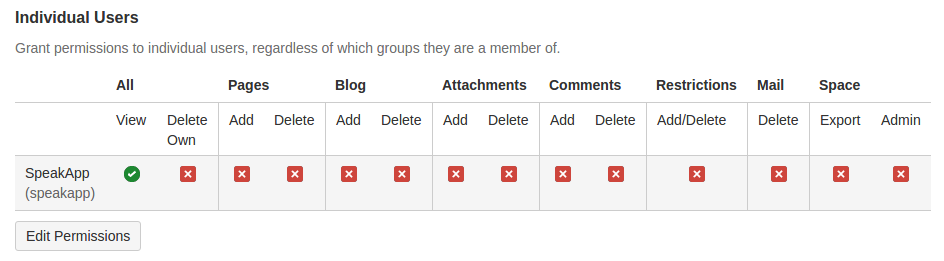
"Edit Permissions" in the "Individual Users" section and add the new user with view only permissions and click "Save all" at the bottom of the page. At the end it should look like at the following picture:
Support
If you have not found a relevant answer here or you have some questions, please contact us.